Quick Navigation Menu
How to Turn Inventory Tracking On In Shopify
Enabling Inventory Tracking During Product Creation
Existing Items - Individual Product Method
Overview
Not tracking your inventory for an item can be handy if the item is a custom-order item or is a service that you offer (e.g. a design fee or a consultation), however, for SKU IQ to properly track your stock quantities and help you avoid overselling across your channels, you'll need to enable inventory tracking on all items you wish to sync.
How to Turn Inventory Tracking On In Shopify
Shopify allows you to enable inventory tracking either during product creation or afterward, for both individual items and in bulk. You can watch the following video or follow the written guide below for a step-by-step process.
Enabling Inventory Tracking During Product Creation
-
On the product creation page, after filling out the basic product information, scroll down to the Inventory section, there, ensure the Track Quantity toggle is turned on.

-
Assign a stock quantity to your Shopify locations in the provided box.

-
If your product has variants, scroll to the Variants section and click the plus sign to add your variation group.

- Once you create your variation group, enter the available stock number for each variant.
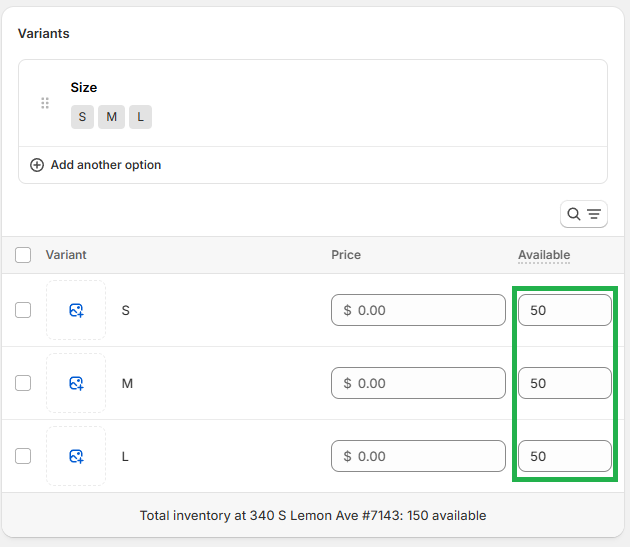
-
Once all details are entered, click Save at the top of your screen.

Existing Items - Individual Product Method
-
Click on the item for which you want to enable inventory tracking and scroll down to the Inventory section. There, click on the Track Quantity toggle to enable inventory management per location.

-
Click on the number in the Available column to add current stock quantities.

-
Adjust your stock using the dropdown options and click Save when you are done.

-
Click Save again at the top of the page to update the listing.
Existing Items - Bulk Method
-
Select the items for which you want to enable inventory tracking.

-
Click the Bulk Edit button on the right side of your page.

-
If the Track Quantity column is missing:
-
Click the Columns button at the top right corner.

-
Scroll down and toggle the Track Quantity option to enable the column.

-
-
Enable quantity tracking by clicking the box in the Track Quantity column.

-
Add the correct inventory quantities to your products.

-
Click Save at the top right corner of your screen.

And that's it! If you return to your products page now, you'll see your items will have stock numbers attached to them.
More Resources:
Shopify Support: Enable Inventory Tracking
Shopify Support: Bulk Editing